The “art” of
winding pegs.
(So your instrument is easy to tune.)
Did
you ever wonder why some musicians struggle tuning their instruments,
while others accomplish it almost effortlessly? The first part of the
secret is having truly round holes and pegs (only trust a reputable
repair shop to shave pegs and ream holes) so they turn evenly and
hold their position. The second part of the secret is to wind the
string around the pegs properly and have the pegs rotated to the
proper angle.
|
Photo
#1
|
Photo
#2
|
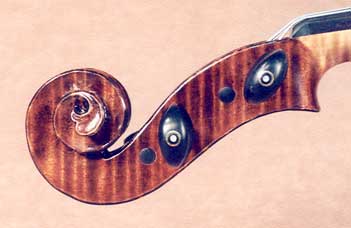
The “secret” is to wind strings consistently,
then clip a small length off the end of the string to make the
angle come out right. (Did you ever wonder why they make the
windings of strings so long?)
|
|
|
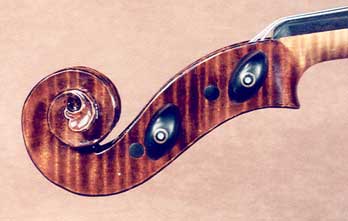
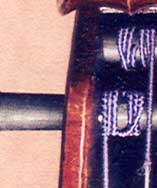
What most musicians consider “the perfect angles”
for the G and D strings.
|
After putting on a new set of strings, sometimes you get
lucky (notice the G peg), and sometimes you don't (notice that
the D needs rotated clockwise about 20-30 degrees).
|
Note: If your strings are barely long enough, shortening them
is obviously not an option. Buy longer strings next time.
(Almost all manufactureres make strings for non-standard
instruments.)
|
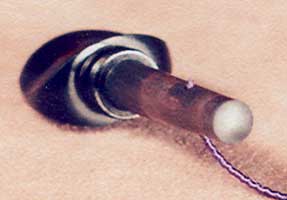
Consistentancy tip #1
Insert the string all the way
through the peg and flush with the other side.
(Peg has been
removed from the instrument for demonstration purposes only.)
|
|
|
|
|
|
|
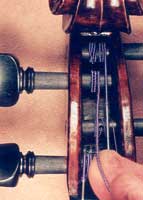
Consistency tip #2
Wind two winds away
from pegbox. (Use judgement: if pegbox is extra narrow, once is
enough; if strings are extra long three times is ok; simply be
consistent!)
|
Consistency tip #3
Cross over the previous
two winds, then wind as close to the pegbox wall as possible
without touching it.
|
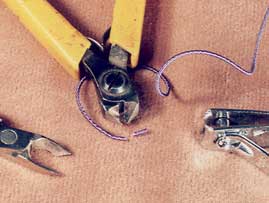
To go from the angle in Photo#2 to the one
desired in Photo #1, trim off a small length of the string and
rewind the string the exact same way. Fingernail clippers work
on soft strings, otherwise use wire cutters.
|
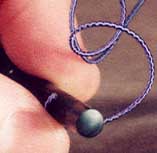
To help properly judge the amount of string
you'll need to cut off, wrap the string around the peg the
number of degrees desired. If still in doubt, make two or three
small cuts until you get the hang of it.
|
|
Photo
#3
|
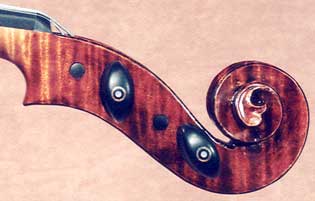
Ref: Photo #3
While most musicians agree
upon the angle of the A peg, the E peg can vary to almost
straight up depending upon how the musician holds their hand
while playing in half-position. (The goal is to keep the side of
the hand from hitting the peg, even when playing wide vibrato.)
|
The process is the same from side to side.
|
|
Extra
peg tips
After
strings have been wound once, it's always more difficult to put them
on and rewind them a second time because the string becomes curled.
Either use tweezers, or straighten out the end the best you can. Some
strings become very flimsy or even begin unwinding, making it almost
impossible to get in the hole or hold their position. For these
“difficult” strings, apply a small drop of superglue to
the end 1/4” (6 mm), wipe it off with a small piece of paper
(not your fingers) and “warm” it over a Bic
lighter. Make sure the glue is completely dry, yet be careful not to
burn the string!
In
emergency situations (on student grade instruments that cost less
than $250), if the pegs are out of round and won't stay put, it's
possible to wind the string tightly against the pegbox and make it
stay. (Not suggested on fine instruments because it will scratch the
pegbox, yet it's always better than pushing the peg in too hard and
breaking the scroll!.)
Something
to watch out for: Sometimes pegs will slip (or never even tighten)
because the hole drilled through them is too close to the pegbox
wall. Sometimes another hole can be drilled further up the shank
(usually at 90 degrees to keep the peg from cracking) other times, it
must be replaced. Ask you local violin shop.
Return
to “What Every Violinist Should Know”
/ Return to Home
Copyright
2005 Kevin Lee Luthier